Last Time, on Inventory Manager…

Our data pull script has run, the database contains all our server \ instance .database information and flowers are blooming; things are good. If this doesn’t sound like anything you have done, head back to the Introduction to see if you missed something.
Now it’s time to get everything connected so we can just fire up a GUI and press some buttons, to get the data we need fast.
How the Sausage is Made
If you’ve been following along with this series, and you’ve set up everything as instructed, then you should be able to download the pre-made GUI script and run it out of the box. If you’re pointing to a custom instance or database just change the $RepositoryInstance and/or $RepositoryDB before firing it up. If you want to learn more about how this was put together, keep reading. If you don’t care how the whazits work, you’re done.
At the top of our list is to create a form with buttons and give them names so we can call them in our Powershell. You can either build the form manually with this guide here, or use Visual Studio*. I’m going to be using the latter method because it’s the most versatile, and frankly the easiest. If you use the former, then you’re kind of on your own. Sorry.
In the Visual Studio method (I’ll be using 2013 Ultimate) you’ll be utilizing Windows Forms and then running them through a “cleaner” to make them Powershell ready. This guide at FoxDeploy explains the whole thing spectacularly and shows you how to create some very complicated UI’s that are Powershell-friendly. I’d recommend going through Parts I and II as they’ll be the things you’ll need to create what we’re going to use here and then come back. Don’t worry, I’ll wait.
Then We Build
Got the GUI code? Cool. The first part of Stephen’s code uses a -replace to filter the Windows Form code and make it work in Powershell. I took that piece and made it a second script so I could just have the clean version of the XAML in my final code. You can find that code here.
Just copy/paste your <Window>…</Window> code over the commented area and run the script. It will spit out the final code and tell you all of the objects you can tie actions to (Name, Value). Then drop in Stephen’s XAML reader code to the main script with the cleaned code and you should have a GUI… that does nothing.

As I mentioned before, when you pushed the XAML code through WPF_to_PSForm.ps1 it will tell you what the objects are on your form. For our purposes, this is simply a few buttons that need to be tied to stored procedures. We do this though .Add_Click() as in the example below:
$WPFBt_All_Data.Add_Click(
{
$sqlCommand = "
EXEC dbo.prGetInventory;
"
$dataset = Invoke-SQL -datasource $RepositoryInstance -database $RepositoryDB -sqlCommand $sqlCommand
Write-Host $dataset
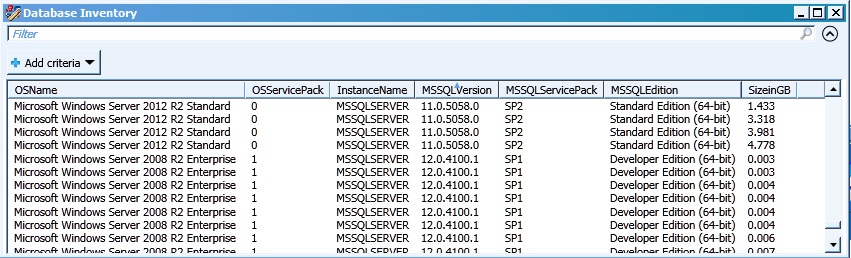
$dataset | Out-GridView -Title "Database Inventory"
}
)
Nothing crazy that we haven’t been doing other than using Out-GridView. This cool little cmdlet pushes datasets out to a customizable table with filtering, sorting the ability to remove columns etc. -Title “SomeTitle” is the window title.
Once you’ve coded all of the buttons, then add the form display at the bottom, using out-null to suppress messages:
$Form.ShowDialog() | out-null
And that’s done. A Winner is You!
What now?
Using these scripts, you can go out and grab any information from the servers\instances you specify, pull it back into a centralized location and then use a GUI front-end to make fine tuning and retrieval easy. As I stated previously, this is a bare-bones system to centralize your database information. You can gather any piece of information from the Server, Instance or Database level by using the same tools that are currently collecting and retrieving this information.
It’s been a long journey, but thanks for sticking with it! If you want to make any alterations to the code or tighten it up (Odin knows that it needs it), feel free to make the changes and shoot them back to me. I’ll definitely give you credit for significant changes in this blog or the code itself.
Also, and I think this goes without saying, but if you want to use this in your personal or business environment: have at it! Just please make sure you give me proper credit, with maybe a link back to my blog/Linkedin? That’d be super cool of you.
Thanks again and happy Inventorying!
–Chartlon Julius
*Full disclosure: I have not tried this with the Community version of Visual Studio, so all the features may not be there.

You must be logged in to post a comment.