
Okay but why?
I have worked with computers since I was old enough to remember. The first computer I had in my room was a Commodore 64/128 (you held down the C= key on boot to switch). It was an elderly machine by the time I got it in the 1990s, but it started me down a path that I’m still on today.
Beyond hobbies and entertainment, I spent many years studying technology. As a hobby and in school where Computer Science was my major. I learned everything from how to solder to how to configure geo-replicated database systems in a hybrid environment. I’d done it all, but I’d never actually done one thing… I’d never actually built a computer. I had all the theory. All the training. All the skills. But I’d never done it.
By built I don’t mean buy the parts from Newegg and assemble it. I’ve done that lots of times. I mean build a usable computer from the ground up. Resistor by resistor, capacitor by capacitor.
I love history, specifically computer history and retro computers. While the cloud is infinite (isn’t it?) the resources on older machines have hard limits. So I started looking around for an older machine that was simple enough to build that I could start with before I tried to actually do the design portion. And I landed on a computer kit. The first computer kit: the Altair 8800.
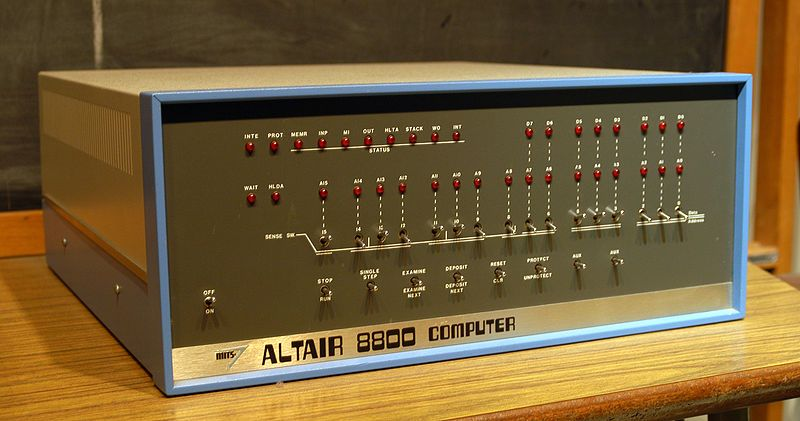
You might have heard of the Altair 8800 released in 1975, it was the first successful personal computer. It was a kit (read: bag of parts in a box good luck) that you had to assemble yourself, and by assemble, I mean you had to solder the boards and write all the software yourself. Perfect!
In fact, when it first became available, it was a such a hit that the company sent out systems with pieces missing, promising to send the rest when they were finished. The Altair, even when fully assembled had no keyboard, monitor, or storage devices. Instead, it had a front panel with switches and lights that you used to enter and run programs in binary code.
It was also the first computer to run a Microsoft program called 4K BASIC (MS BASIC), which Paul Allen had finished on the plane while flying to demonstrate the software. There were a lot of firsts here!

I have always been fascinated by the Altair 8800, and I wanted to experience what it was like to use one. However, even if you have the kit instructions, which you can get online for free, a lot of the parts aren’t made any more. Seriously, try finding a working Intel 8080. They’re expensive even if you can find one. So, I picked up the kit from adwaterandstir.com, which is a replica of the original Altair 8800 that runs on an Arduino Duo microcontroller.
It has the same look and feel as the original, but half the size since entire boards could be replaced by single chips with modern technology. That said, it works just like the original; you could connect it up to a 1975 teletype and it wouldn’t know the difference.
So we’ve got our choice…
Let’s put this together.

I’m not going to go step-by-step through the process, but I wanted to give an idea of what’s involved. There’s a lot of soldering which is fun if you’re into that kind of thing (points to self).
The components on the main board include the CPU, the LED display driver, the switches, and some resistors and capacitors. The soldering was not very difficult, but it required some patience and precision. I would recommend using a fine soldering tip as some of the resisters are a little tricky. Maybe use a multimeter to check for continuity and shorts after each solder joint. This doubles as a good way to check to make sure the resistors aren’t duds.
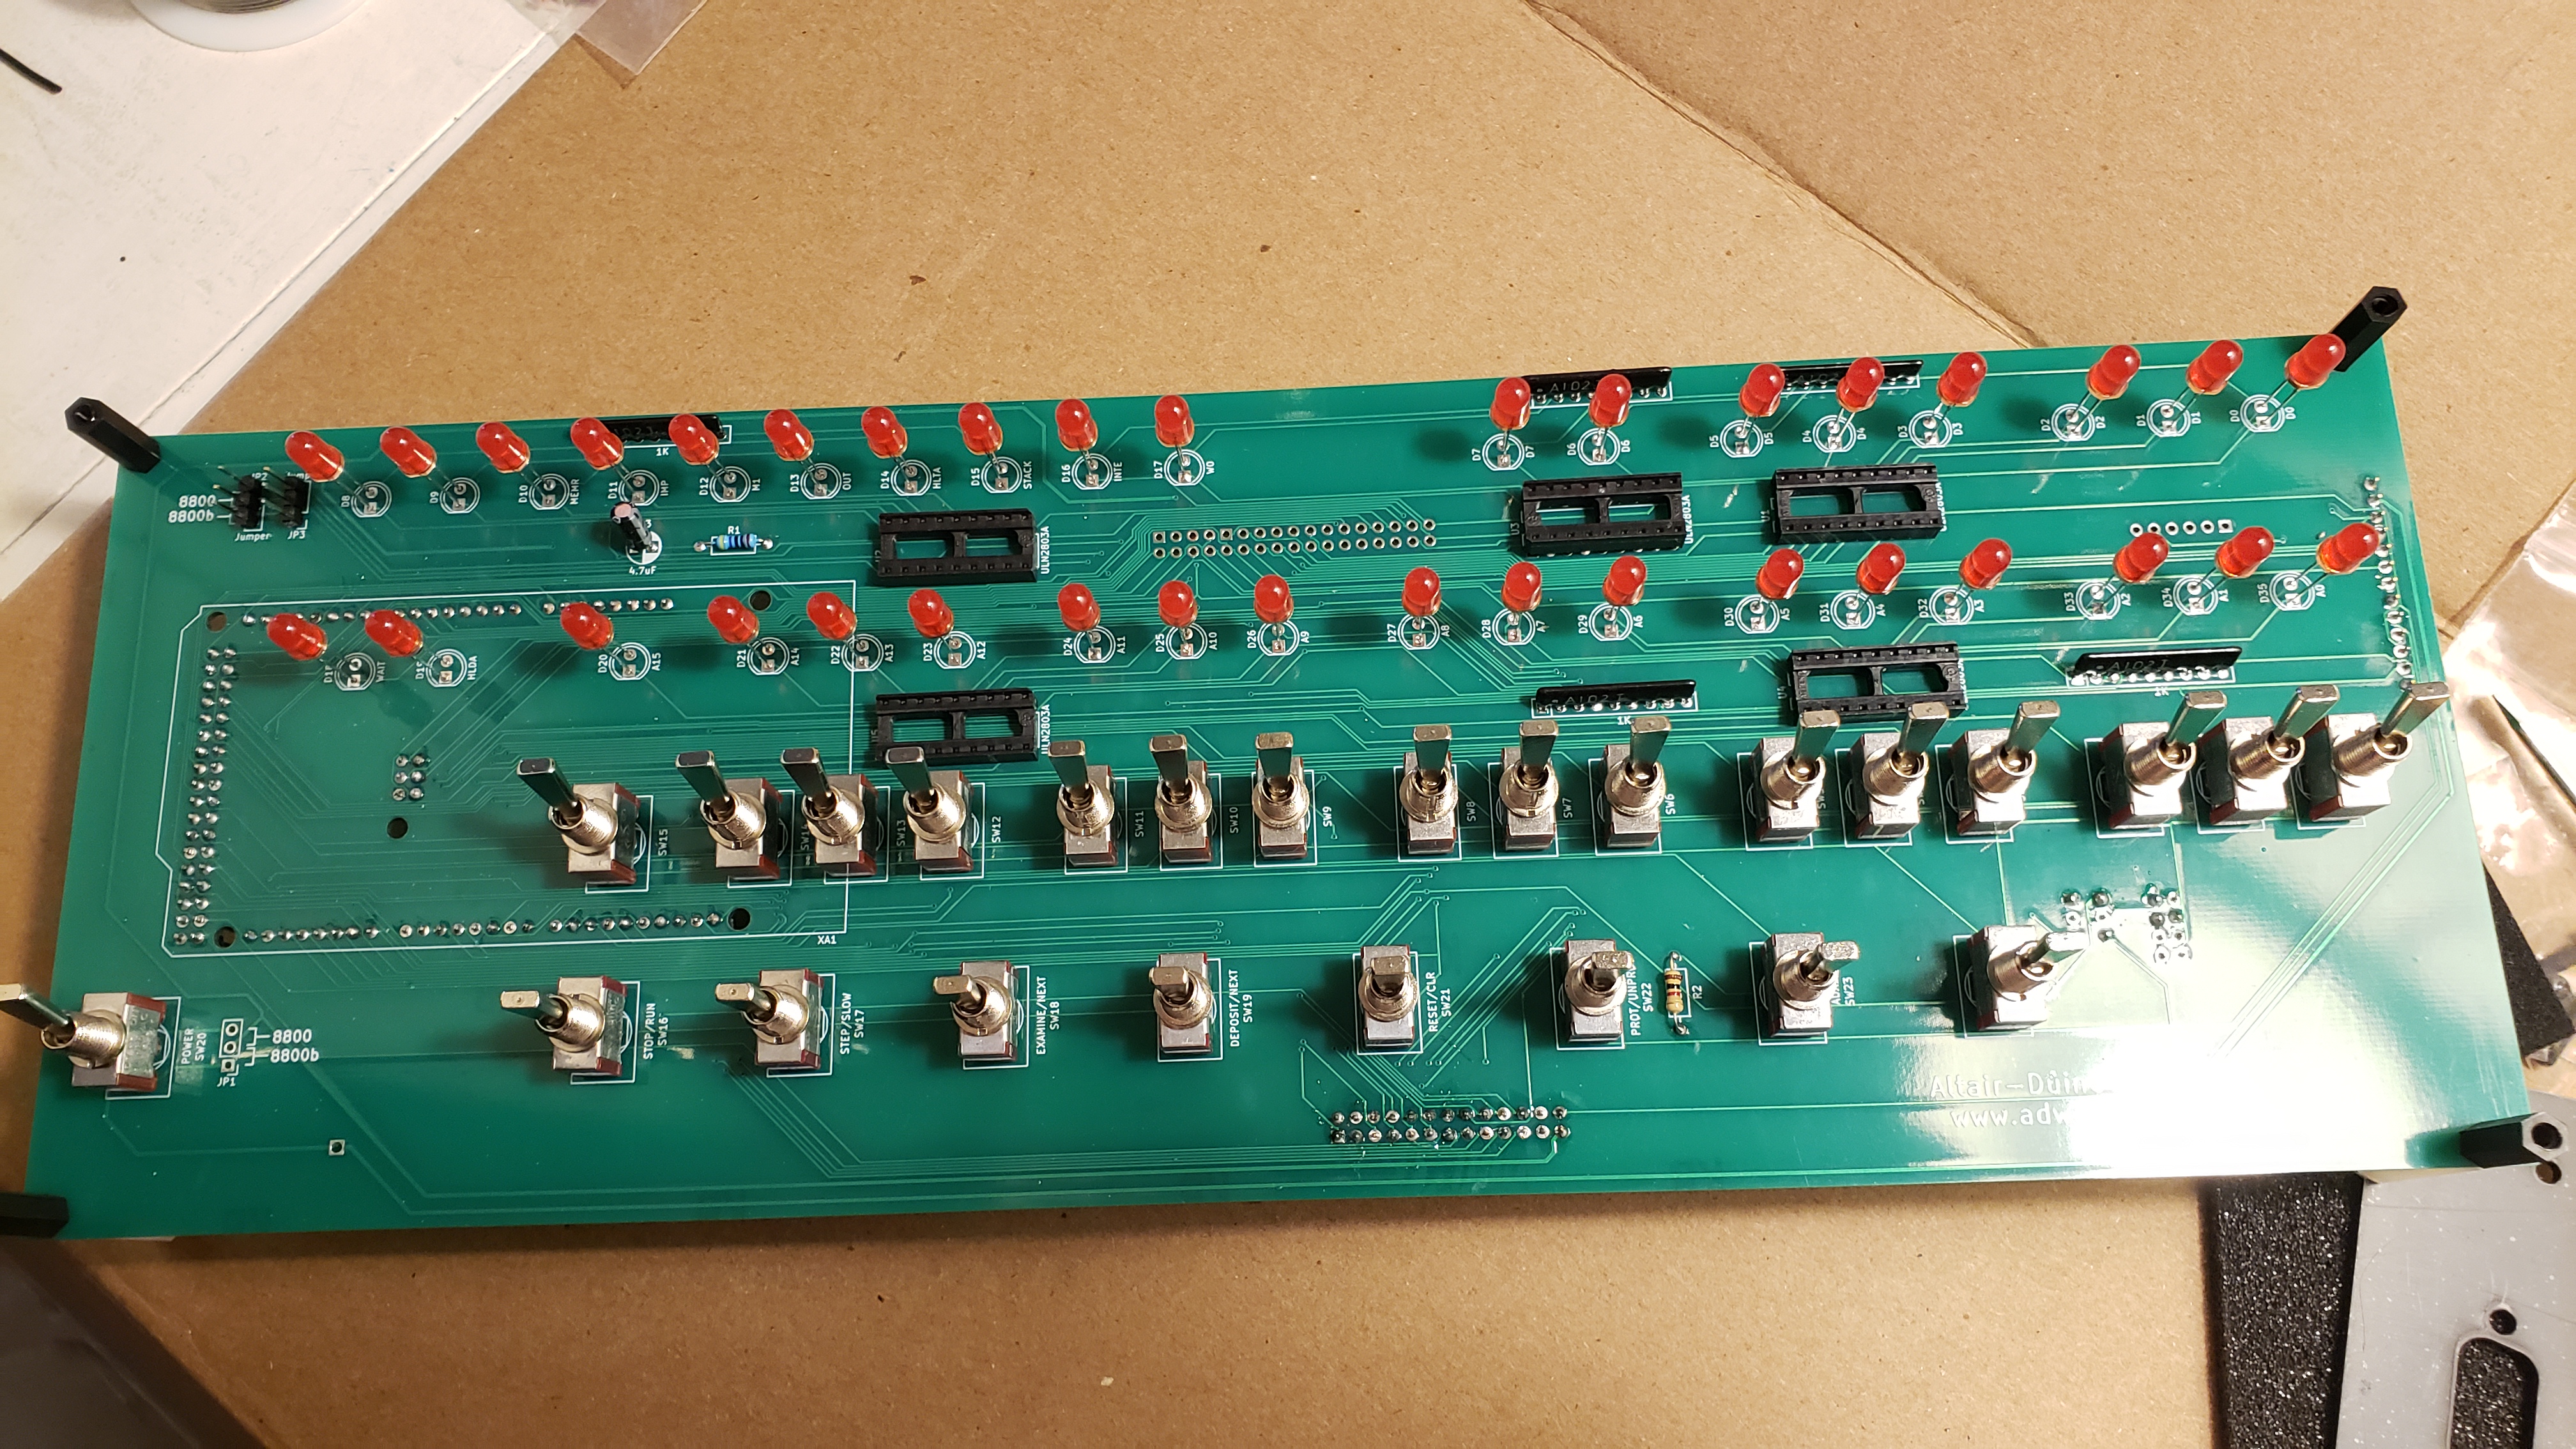
The front panel assembly was more challenging than the main board assembly, because it involved lining everything up perfectly all at once and then soldering as a single group. There are 36 LEDs and 25 toggles and LORDY BABY GEE if you don’t get them exactly right. You have to realign all of them, which involves pulling them all out and trying again. Each switch has four wires: two for power and two for data, while each LED has two wires: one for power and one for ground. The wires had to be cut to length, twisted, soldered, and routed neatly through holes on the PCB. This is easily the longest part of the build and requires a steady hand and concentration.

Since there are no Intel 8080 chips out there that you can get for any price cheaper than your firstborn, we swap these out with an Arduino Due emulating an 8080. Clocking in at an impressive 84Mhz, the Arduino won’t run Crysis, but it will fake a 2Mhz 8-bit processor from the 70s pretty well.
The headers go on pretty easily considering what we just went through with the toggles and LEDs. You can actually connect it up to a PC and check to make sure it runs through the USB. I would recommend this because getting this thing out after everything is together will be a chore.

Next, I added an expansion board which is what it sounds like. It’s way more compact than the original that shipped back in the day, but it supports a lot of the same stuff and more. You can do add some of the following cards to it:
- LED Ouput Card: This is the only one I have installed right now. It allows you to test logic functions and such to produce output on the LEDs on the card.
- Music Card: This module emulates a Processor Technology Music System card, which was one of the first sound cards for the Altair 8800. It allows the user to play music and sound effects using an audio jack.
- RTC (Real-Time Clock): Adds a real-time clock to the kit, which keeps track of the date and time even when the kit is turned off.
- Z80 CPU: This is probably my next card to add. It replaces the Intel 8080 emulation with a Zilog Z80 CPU emulation. the Z80 offers more instructions, registers, and features. Also Z80-specific software, such as CP/M 3, MP/M, Turbo Pascal… the list goes on.
- 64 KB RAM: Does what it says on the tin. Adds 64 KB of RAM to the kit, which increases the total memory available from 64 KB to 128 KB. Probably need this if you’re going to run Turbo Pascal, but that’s just a guess.

The case assembly was a breeze compared to the previous steps, but it still required some care. I had to make sure that everything fit snugly and aligned properly and to not to damage any components or wires while screwing them in. This is easier said than done.
And that’s pretty much it. I put this together in a few weeks, but you could probably do it in a weekend if you were really committed. For a working computer there’s not really a lot going on compared to today’s machines. They would take a month just to solder all the parts onto the motherboard, much less all the other cards and such. Even the power supply is just a regulator and a transformer.

But wait there’s more! Now, we need to talk about…
The Software
There’s a lot of software you can get for the Altair 8800. There’s still quite a programming scene, if you can believe it! If you have 4K or 8K BASIC installed, you can run from that or assembly code. It executes basically the same, loading them into memory (one bit at a time) and then telling the system to run them. You can view output by attaching a terminal cable like the old teletype machines or with the mouse/keyboard if you want the non-authentic experience. No judgements here.

Some of the programs out there worth noting are:
- Kill-the-Bit: This was a simple game that involves toggling switches to catch a moving bit on the LED display. It was one of the first programs that was published for the Altair 8800 in Popular Electronics.
- 4K BASIC: This was a version of BASIC interpreter that was written by Bill Gates and Paul Allen. It has the basic commands like PRINT, INPUT, IF, FOR, GOTO, GOSUB, RETURN, etc. It also had some mathematical functions, such as SIN, COS, TAN, SQR, etc. It doesn’t however, have string variables, arrays, or floating point numbers.
- 8K BASIC: 4K but better (twice as better?) Has more commands like READ, RESTORE, PEEK, POKE.
- CHESS: A very impressive chess program written by David H. Ahl, the founder of Creative Computing magazine. It can play against you and is quite proficient at the higher difficulties!
For your viewing pleasure, my wonderful 4K basic program and output. Stand in awe.
10 FOR I=1 TO 10
20 PRINT I
30 NEXT I
1
2
3
4
5
6
7
8
9
10
Also, an assembly code program which just moves LEDs around for giggles:
0000: C3 03 00 FF FF FF FF FF FF FF FF FF FF FF FF FF
0010: 00 00 00 00 00 00 00 00 00 00 00 00 00 00 00 FE
0020: FE FE FE FE FE FE FE FE FE FE FE FE FE FE FE FE
0030: D3 F8 DB F8 E6 F0 D3 F8 DB F8 E6 F0 D3 F8 DB F8
0040: E6 F0 D3 F8 DB F8 E6 F0 D3 F8 DB F8 E6 F0 D3 F8
0050: E6 F0 D3 F8 DB F8 E6 F0 D3 F8 DB F8 E6 F0 D3 F8
0060: E6 F0 D3 F8 DB F8 E6 F0 D3 F8 DB FC E6 FC D3 FC
0070: DB FC E6 FC D3 FC DB FC E6 FC D3 FC DB FC E6 FC
0080: D3 FC DB FC E6 FC D3 FC DB FC E6 FC D3 FC DB FC
0090: E6 FC D3 FC DB FC E6 FC D3 FC DB FA E6 FA D3 FA
00A0: DB FA E6 FA D3 FA DB FA E6 FA D3 FA DB FA E6 FA
00B0: D3 FA DB FA E6 FA D3 FA DB FA E6 FA D3 FA DB FA
00C0: E6 FA D3 FA DB FA E6 FA D3 FA C9 C9 C9 C9 C9 C9
Writing code on the Altair is really difficult compared to today. No error checking (unless you wrote it yourself). Going back and re-writing code was a chore; many times, it was easier to just start over, or gasp writing it out on paper first! I enjoyed it for what it was but I’m missing even the simplest of IDEs.
Sooo…. What did we learn?

My main goal for this whole project was to build a computer from scratch. Mission accomplished. It is built; it runs, and it does things. A lot of the theory I had really “met the road” when I had to work through actual physical problems on an actual physical machine. As somewhat of a sidenote, I learned that I did not have all the tools I thought I needed. I had the soldering iron, multimeter, etc. But other items like an LED tester and non-static props I did not.
As far as the Altair itself, it’s surprisingly capable for being a lot of firsts. It of course had only 64K of memory and no long-term storage but made up for it in many different ways. While the 2Mhz clock speed of the Intel 8080, it was able to execute useful programs that could do things. Connected with a terminal teletype I could see this being actually of some utility which surprised me.
The Real Adventure was the Optimizations We Made Along the Way
But the big one for me, beyond the capabilities of the machine, or building it myself, was something I was not expecting to re-learn. Working in Data, you get caught up in the mass volumes of stuff that doesn’t perform well, and the solution is usually to throw more powerful stuff at the stuff until the stuff works at the speed that stuff should work at according to people who use that stuff. We get used to scaling up or scaling out to fix our problems.
This is not an option on this machine or any machine of this era. You had what you had, and you needed to make it work. There are many tricks you can see in the programs for this machine, and a lot of them are very clever. If you have a free afternoon, I recommend looking at how the AI in the Chess program makes decisions. It’s much more A than I, and that’s what makes it so great.
Every bit matters. Anything that can be done in one step rather than two or that frees up a critical resource for a few more cycles is a must. I feel like this is slowly becoming a lost art this close-to-the-metal. A bad query just has more memory thrown onto it. A poorly designed web app is just put onto a bigger server farm. After all, the cloud is infinite… isn’t it?
-CJ Julius

You must be logged in to post a comment.